
![detailingshop-header-pic1[1]](https://nimbuswhip.com/wp-content/uploads/2026/02/detailingshop-header-pic11.svg#627)
![detailingshop-header-pic2[1]](https://nimbuswhip.com/wp-content/uploads/2026/02/detailingshop-header-pic21.svg#628)
![detailingshop-header-pic3[1]](https://nimbuswhip.com/wp-content/uploads/2026/02/detailingshop-header-pic31-1.svg#813)


Aspiring bakers and home baristas frequently ponder this very question. They seek a convenient shortcut for creating fluffy dessert toppings. However, achieving professional-quality results demands specific ingredients.
True success with a whipping siphon relies on a precise chemical reaction. The gas, typically nitrous oxide (N2O), must interact with the correct dairy fats. This interaction creates the stable, pillowy foam we all love.
This guide delves into the science behind the perfect whip. We will explore the technical reasons why dry dairy products often fail in this application. Professional insights will show you how to achieve a consistent texture every single time.
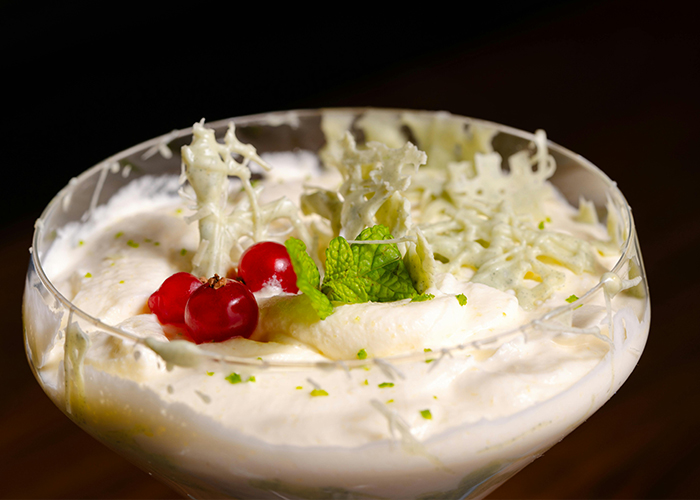
Traditional heavy cream remains the undisputed gold standard. Its fat content and structure are uniquely suited for charging with gas. This ensures a delicious and stable topping for cakes, hot chocolate, and specialty coffees.
Following expert-led instructions unlocks your equipment’s full potential. You will learn to create impressive results while sidestepping common frustrations linked to improper ingredient choices.
Key Takeaways
- Professional whipped cream results require specific dairy fats found in liquid heavy cream.
- The nitrous oxide in a dispenser needs to interact with these fats to create a stable foam.
- Reconstituted dry milk products generally lack the necessary structure for proper whipping in a siphon.
- Heavy whipping cream is the recommended and most reliable ingredient for this culinary tool.
- Using the correct ingredient prevents common issues like runny or collapsed foam.
- Understanding the basic science leads to more consistent and successful results.
- Maximize your kitchen gadget’s performance by following expert guidelines.
Introduction to Whipped Cream Dispensers and NimbusWhip
Reusable dispensers transform the simple act of making whipped cream from a chore into an instant culinary delight. This professional equipment delivers consistent, high-quality results that surpass store-bought alternatives.
Overview of NimbusWhip Products and Charger Options
NimbusWhip, accessible at https://nimbuswhip.com/, provides professional-grade equipment. Their products are engineered to replace expensive, single-use aerosol cans. The company offers various charger sizes to suit different needs, from home use to commercial kitchens.
| Feature | Single-Use Aerosol Can | NimbusWhip Reusable Dispenser |
|---|---|---|
| Cost per Use | High (~$5 per 13oz can) | Low (initial investment only) |
| Texture Quality | Often artificial, less stable | Professional, consistent foam |
| Ingredient Control | Limited to pre-made formula | Full control over cream and flavorings |
| Environmental Impact | High waste (canister disposal) | Sustainable, reusable system |
Benefits of Nitrous Oxide and Reusable Dispensers
Nitrous oxide is the essential gas that creates the perfect foam texture. It aerates the cream uniformly, producing results that canned products cannot match.
Many coffee shops, including Starbucks, use this technology daily for fresh toppings. Investing in a durable whipped cream dispenser saves significant money over time. You avoid paying nearly $5 for small store-bought cans.
This tool allows quick preparation of toppings for coffee and desserts. The process takes a fraction of the time compared to traditional whipping methods.
Understanding Your Whipped Cream Dispenser
The core function of this kitchen tool hinges on a simple yet fascinating scientific principle. Grasping the mechanics behind it explains why specific ingredients are non-negotiable for success.
How Dispensing Technology Works
A professional whipped cream dispenser relies on nitrous oxide (N2O). This food-grade gas is odorless, tasteless, and entirely safe.
N2O possesses a unique trait: high solubility in fatty compounds. Inside the sealed canister, the gas dissolves completely into the cold, fat-rich cream. It remains bound there until the lever press triggers a pressure release.
This instant expansion is dramatic. The device can generate up to five times the volume of the original liquid. You get an enormous yield from a small amount of base recipe.
Advantages Over Traditional Whipping Methods
Contrast this with old-fashioned whipping. That process needs a stand mixer, bowls, and several minutes of active monitoring.
A dispenser streamlines everything. Preparation often takes under two minutes of hands-on time. There is no pile of dirty equipment to wash afterward.
The result is a consistently thick, stable foam. This quality matches the standard found in professional pastry kitchens. The technology guarantees reliability that manual methods cannot.
Can You Use Powdered Cream Mix in a Whipped Cream Dispenser
The quest for flawless foam begins long before the dispenser’s lever is pressed. While the question of dry mixes arises, the science of aeration demands specific liquid properties.
Success hinges on the physical structure of the base ingredients. Only certain dairy products can form the stable matrix needed to trap gas.
Expert Tips on Ingredient Preparation
Fat is the essential building block for foam. The whipping cream must have a minimum fat content of 28% to produce a stable structure.
For superior results, select heavy whipping cream with at least 30% fat. This ensures the foam holds its shape after dispensing.
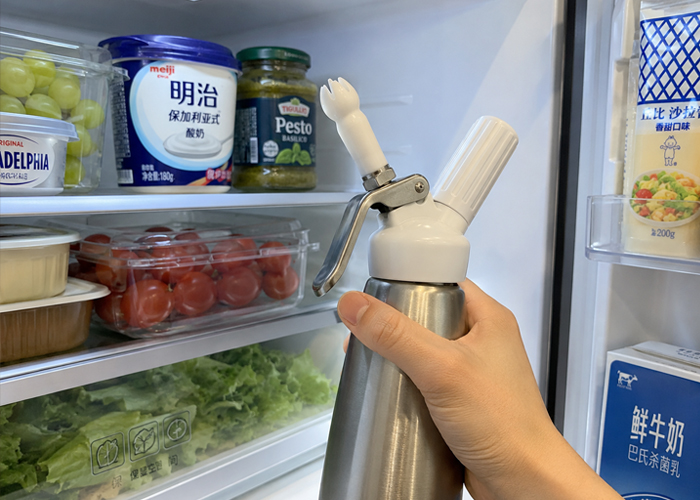
All ingredients must be thoroughly chilled. Cold temperatures keep the fat firm, which is critical for proper aeration inside the whipped cream dispenser.
| Fat Content | Dairy Product | Expected Result in Dispenser |
|---|---|---|
| Less than 28% | Low-fat milk, half-and-half | Liquid, fails to whip |
| 28% – 30% | Standard whipping cream | Good foam, may be less stable |
| 30% and above | Heavy whipping cream | Optimal, stable, and thick foam |
Key Techniques for Achieving the Perfect Texture
Proper whipping relies on the correct gas-to-liquid ratio. Do not overfill the canister; leave space for the gas to dissolve.
Shake the charged dispenser vigorously. This action evenly distributes the nitrous oxide throughout the cold cream.
Dispense with the unit held upright. A smooth, consistent press on the lever yields the lightest, airiest texture. The high fat content is what gives the foam its luxurious mouthfeel and lasting peaks.
Step-by-Step Guide to Preparing Whipped Cream
Follow this detailed guide to create luxurious whipped cream in just minutes. The process is simple but requires attention to detail for optimal results.
Preparing and Chilling Ingredients for Best Results
Start with one cup of cold heavy whipping cream. Ensure all ingredients are thoroughly chilled for the best texture. Cold fat is essential for proper aeration.
Add two tablespoons of powdered sugar and two teaspoons of vanilla extract. This classic flavor profile enhances the natural taste of the cream. You can adjust sweetness to your preference.
Do not exceed the fill line in your half-pint canister. Proper measurement prevents issues during charging. Overfilling can lead to poor foam quality.
Charging the Dispenser and Dispensing the Cream
Secure the lid tightly after adding ingredients. Insert a single charger to inject the gas. Make sure the connection is firm.
Shake the dispenser vigorously for 30 to 60 seconds. This evenly distributes the nitrous oxide throughout the cream. The shaking time is critical for consistency.
Hold the unit upside down with the nozzle pointing straight down when dispensing. A smooth press on the lever yields perfect peaks. This position ensures the gas propels the cream out effectively.
This recipe takes only two minutes to complete. It delivers a fresh, professional-grade topping for desserts and beverages. Enjoy immediately for the best flavor and texture.
Troubleshooting and Expert Tips
Temperature control is the unsung hero of stable, long-lasting whipped cream. Even with perfect ingredients, small oversights can affect your results. These expert tips help solve common problems and keep your equipment in top condition.
Avoiding Ingredient and Technique Mistakes
The fat in your cream must stay firm. If the temperature rises above 50°F, it becomes too soft. The structure will collapse, creating a runny mess.
Homemade whipped cream stored in a dispenser stays fresh for 7-10 days. Always refrigerate the entire canister. This preserves texture and flavor.
| Common Issue | Likely Cause | Recommended Solution |
|---|---|---|
| Runny, liquid foam | Cream or dispenser not cold enough; fat content too low. | Chill all ingredients and equipment thoroughly before use. |
| Clogged or slow nozzle | Old cream residue solidified inside. | Rinse the nozzle immediately after each use. |
| Foam loses volume after a few days | Gas has partially dissipated. | Insert a fresh charger to re-whip the contents. |
Maintaining and Cleaning Your Dispenser Effectively
Proper care ensures your dispenser performs reliably for years. Make sure to follow a simple post-use routine.
Briefly rinse the nozzle under warm water after every session. Remove it to clear any buildup that could harden. This prevents frustrating clogs during your next dessert preparation.
- Store the charged canister upright in the refrigerator. This maintains pressure and freshness.
- If the cream turns runny, a single re-charge can often restore its texture.
- Handle chargers with care and store them in a cool, dry place. Proper maintenance guarantees they function correctly every time.
Creative Flavor Enhancements and Variations
The true artistry of a whipped topping lies in its ability to carry and enhance flavor. Once you master the basic technique, personalizing the taste profile is the logical next step.
Incorporating Vanilla, Extracts, and Sweeteners
Classic vanilla extract is the most common starting point. Add one to two teaspoons for a rich, familiar flavor.
For other extracts like almond or peppermint, begin with just half a teaspoon. Their potency can overwhelm the delicate cream. Always taste your mixture before charging the dispenser.
Sweeteners are equally important. Powdered sugar integrates seamlessly. Ensure it is finely sifted to avoid a gritty texture.
Liquid sweeteners, such as maple syrup, also work well. Use one to two tablespoons, adjusting to your preference.
| Flavoring Agent | Recommended Quantity | Best Pairing |
|---|---|---|
| Pure Vanilla Extract | 1-2 tsp | Chocolate cake, fruit pies |
| Almond Extract | 1/2 – 1 tsp | Coffee drinks, poached pears |
| Citrus Zest (lemon/orange) | 1 tbsp, finely grated | Berry desserts, cheesecake |
| Ground Spices (cinnamon, nutmeg) | 1/4 – 1/2 tsp | Pumpkin pie, hot chocolate |
Experimenting with Alternative Ingredients and Mix-Ins
For a chocolate whipped cream, sift in two tablespoons of cocoa powder. Other dry ingredients like instant espresso work similarly.
Strain the cream if using zest or whole spices to prevent nozzle clogs. This ensures a smooth dispensing experience.
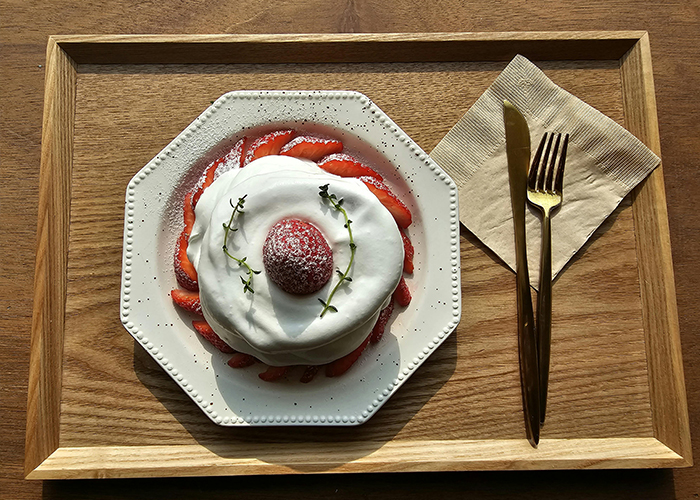
These creative variations allow your whipped cream to complement specific desserts perfectly. A citrus-infused foam elevates a summer berry tart, while spiced cream is ideal for autumn treats.
Wholesale Options and NimbusWhip Product Range
For professional kitchens and high-volume operations, selecting the right gas supply is a critical efficiency decision. NimbusWhip caters to this need with a specialized product lineup.
The company offers bulk chargers designed for continuous use. These options prevent interruptions during peak service hours.
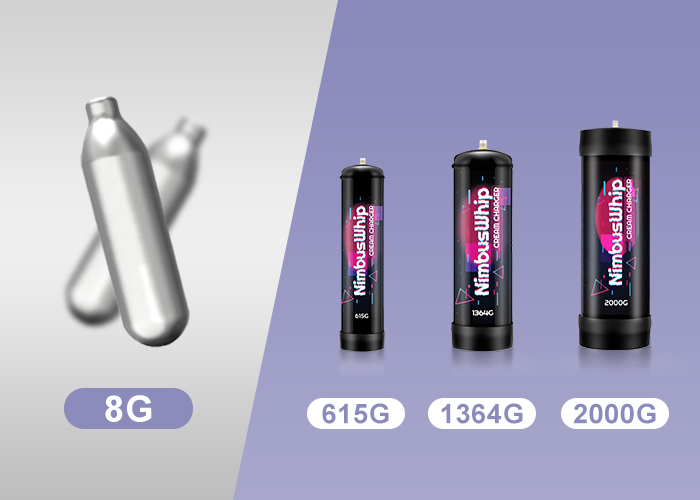
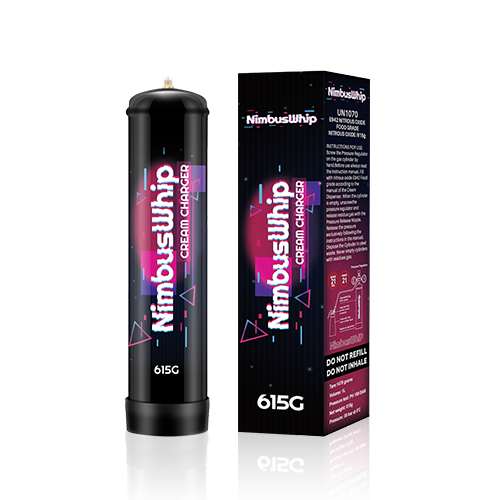
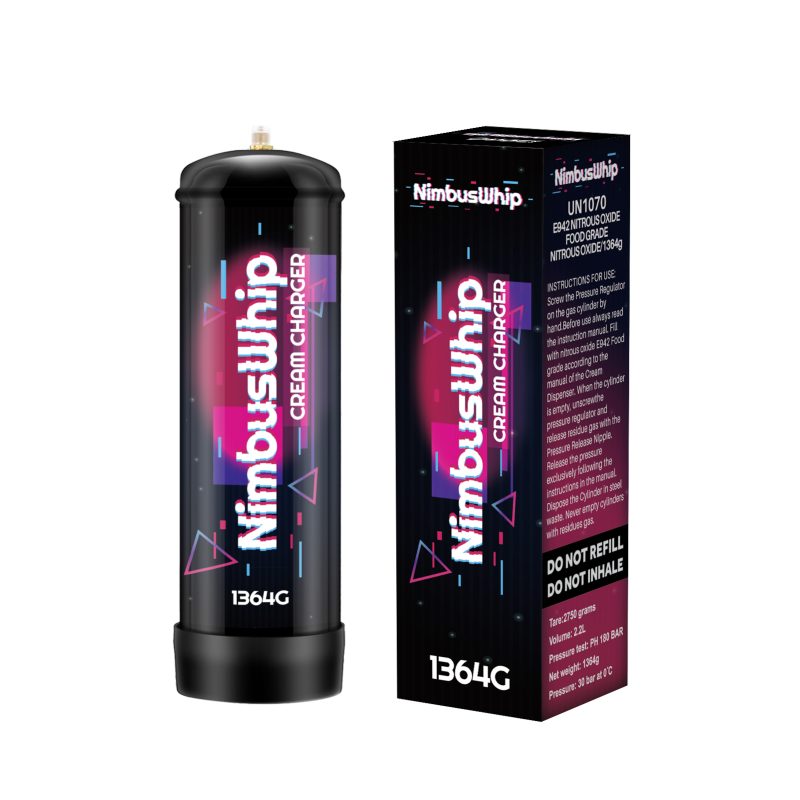
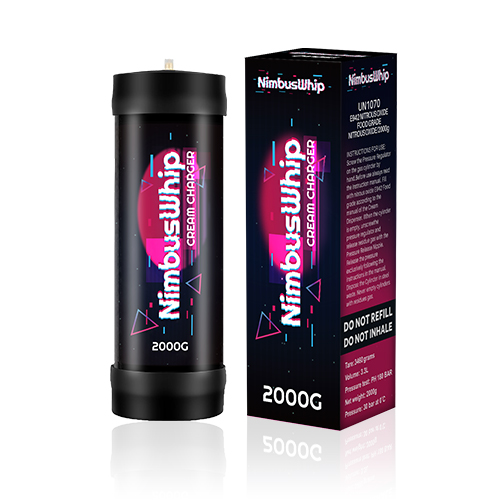
Exploring Charger Sizes (1L, 2.2L, 3.3L) and Their Uses
Choosing the correct N2O capacity ensures your dispenser never runs out of gas. The three main sizes serve distinct operational scales.
| Charger Size | N2O Capacity | Ideal Application |
|---|---|---|
| 1L | 615g | Moderate-volume cafes or catering |
| 2.2L | 1364g | Busy coffee shops and bakeries |
| 3.3L | 2kg | High-output commercial kitchens |
Detailed specifications for the 1L charger, 2.2L charger, and 3.3L charger are available online. Larger capacities reduce the frequency of changes.
This saves valuable prep time when serving coffee and desserts. Your staff can focus on customers instead of equipment.
Where to Find Wholesale Information on NimbusWhip
Businesses seeking bulk pricing should visit the dedicated wholesale portal. This page provides all necessary details for volume orders.
Establishments that regularly prepare fresh whipped cream benefit most. Investing in larger chargers optimizes workflow and lowers cost per serving.
These professional-grade supplies keep your dispensers operating at peak efficiency. Consistent gas delivery is the foundation of perfect foam.
DIY Recipes and Innovative Uses in the Kitchen
A whipped cream dispenser is a versatile tool that can transform simple ingredients into elegant culinary creations. Its capability extends far beyond the classic dessert topping.
This equipment empowers home cooks to experiment with textures and flavors. You can achieve professional-grade results for both sweet and savory dishes.
Simple Whipped Cream Dispenser Recipes for Desserts
The foundation is a basic whipped cream recipe. Combine one cup of cold heavy cream with your preferred sweetener.
For a signature coffee shop flavor, many baristas use two ounces of vanilla syrup instead of powdered sugar. This technique creates a consistent, smooth taste.
| Recipe Type | Key Ingredients | Best For Topping |
|---|---|---|
| Classic Vanilla | Heavy cream, powdered sugar, vanilla extract | Pies, hot chocolate, fruit |
| Chocolate Cream | Heavy cream, cocoa powder, sweetener | Cakes, ice cream sundaes |
| Citrus-Infused | Heavy cream, citrus zest, honey | Berry tarts, angel food cake |
Beyond Whipped Cream: Creative Mousses, Foams, and More
The same gas-charging principle works for light mousses and airy foams. Simply use a suitable liquid base like fruit purée or savory stock.
You can even create infused oils or vinegars by charging them with N2O. This rapidly incorporates flavors for dressings or finishing touches.
Always follow manufacturer tips for your specific canister. Proper technique ensures the best texture for these innovative results.
Experimenting with different ingredients unlocks your kitchen gadget’s full potential. The possibilities are nearly endless.
Conclusion
Mastering the art of homemade whipped cream unlocks a world of culinary creativity. This kitchen tool delivers professional results with minimal effort.
Using high-fat heavy cream ensures a stable, delicious topping every time. This approach is cost-effective and superior to store-bought alternatives. It is perfect for Holidays and offers a Gluten Free option.
Keep all ingredients thoroughly chilled and maintain your dispenser properly. These simple tips guarantee reliable performance.
Experiment with vanilla extract, maple syrup, or other flavorings. Create unique dessert experiences that delight guests. Your kitchen capabilities will expand dramatically.